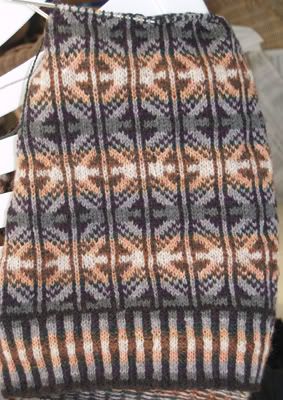
The Kelebek Vest is now about 14 inches long. After I get a shower and a snack, I'll work my way up to the armhole zone. Yes, I will take lots of pictures of the steeks as they progress and describe just how you can make them in your next project. The armholes will be quite large compared to what you might expect. I don't want the shoulders of my vest to hang off, but rather, to hit my natural shoulder. Considering the armhole ribbing will be about 1.25 inches, I need to get rid of a lot of body stitches from the underarm zone to make this transition. I think this is an area where designers often could do a better job, especially when they try to apply a formula to larger sizes. In my case I am going to put about 5 inches of stitches on hold in each underarm area. (This will be diminished by the trim when it gets added.) Then I'm going to decrease away another 20 stitches on each side of the armhole, so that the width at the vest back, before trim, will be about 13 inches. Much narrower than half my full bust finished size.
Let's Learn About Color; Lesson 1
Value: the relative lightness or darkness of a hue.

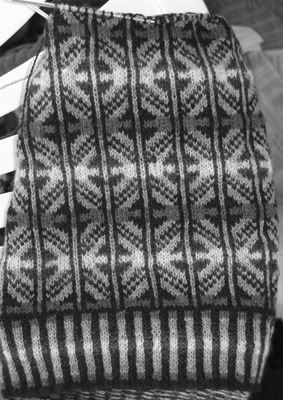
In this greyscale version of the photo at the top of the post, you can see that both my foreground and background colors progress through a range of values, but that all the foreground colors are darker than all the background colors. This allows the design to be seen through the various color changes. To me, one of the most crucial aspects of a successful Fair Isle design is proper control of value.

9 comments:
Nice.
I love it! And I love the color lessons too. A Steek Lesson would be awesome, as I'm seriously contemplating a steeked sweater as my next sweater (and my first steeks)!
Thanks for the idea of plying the yarn with another. I have some tussah silk that I've decided to ply it with!
Excellent first lesson!
I have to say, while I'm still not to crazy about the colours (sorry!), I absolutely adore the greyscale version! It's a lovely pattern.
This brings me to my question, can you offer any tips on subbing colours in a fair-isle design? So many times I've loved a certain design, but disliked the colours. Should I just do like you did and try a bunch of colours until I get a combination I like?
That's okay, Joeli. I know they aren't for everybody. I'll try to come up with a good post about subbing colors. But start by looking at the ones you like, or think about the color families you like to wear.
Also, think about the ones you don't like and why. Make some swatches just for fun and prepare to see things differently than you expect.
Now steeking isn't limited to fair isle right? I guess I've only ever seen it done on fair isle. Obviously it's easier to shape stuff that isn't fair isle, but I could see myself steeking a solid sweater just for the fun of it.
I can't wait to see the progression! Scissors excite me!
I love it. Are you thinking of a sleeve pattern variant? I know it's a lot of work, but that sweater is gorgeous and would be so pretty as a sweater and not just a vest.
The more I look at the pics, the more I fall in love. Maybe for my next fair isle . . .
That is looking sooo nice! And, I very much appreciate your color tutorial -- the part having the gray scale was eye-opening!
Looking so good!! Can't wait to see the rest and all the tips! :)
That is breathtakingly good looking. I'm looking forward to hearing about it as it comes along! What size needles are you using? That looks as if it might make a girl go blind (not that vintage patterns are much larger gauge.)
Post a Comment